Setup guides, material settings, software downloads, and troubleshooting tips. Bookmark this page — it is the fastest way to get answers.
Most users complete their first project within 60 minutes of opening the box. Here is the path from unboxing to first cut.
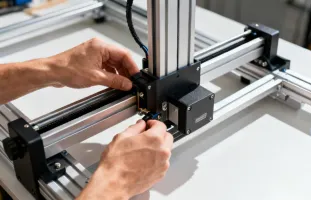
The Laser Master 3 ships 90% pre-assembled. Connect the gantry to the base, plug in the laser module, and tighten six bolts. Tools are included in the box. Average time: 20 minutes.
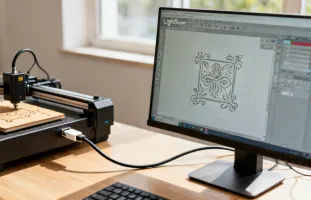
Download LaserGRBL (free) or LightBurn ($60, one-time). Connect via USB or Wi-Fi. The machine auto-homes on power-up — no manual calibration needed for your first session.
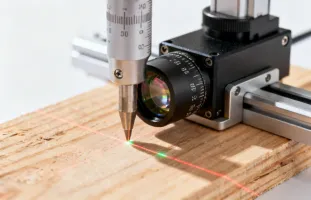
Place the included focus gauge on your material. Lower or raise the laser module until the gauge sits snug underneath. This sets the focal distance to the optimal 40mm for the sharpest beam convergence.
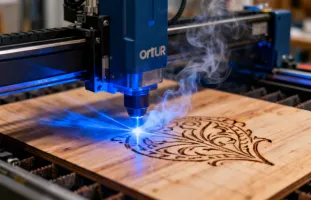
Load an SVG or image, set power and speed using our material presets below, hit Start. Your first engraving — typically a test grid or a name tag — takes about 3 minutes on basswood.
Tested on the Laser Master 3 with 10W and 20W modules. These are starting points — always run a small test on your specific material batch before committing to a full job.
| Material | Operation | 10W Module | 20W Module | Passes | Notes |
|---|---|---|---|---|---|
| Basswood (3mm) | Cut | 100% / 3mm/s | 100% / 8mm/s | 1 | Clean cut, minimal charring |
| Basswood (3mm) | Engrave | 40% / 6000mm/min | 25% / 8000mm/min | 1 | Good contrast at 254 DPI |
| Plywood (5mm) | Cut | 100% / 1.5mm/s | 100% / 4mm/s | 2 | Birch plywood recommended; avoid MDF |
| Black Acrylic (3mm) | Cut | 100% / 2mm/s | 100% / 5mm/s | 2 | Clear acrylic not supported (445nm passes through) |
| Leather (2mm) | Engrave | 30% / 5000mm/min | 15% / 8000mm/min | 1 | Vegetable-tanned only; avoid chrome-tanned (toxic fumes) |
| Stainless Steel | Mark | 100% / 500mm/min | 80% / 1000mm/min | 1 | Creates dark oxide mark; not deep engraving |
| Anodized Aluminum | Mark | 60% / 3000mm/min | 40% / 5000mm/min | 1 | Removes anodization layer to reveal bare aluminum |
| Slate / Stone | Engrave | 90% / 3000mm/min | 70% / 5000mm/min | 1 | Photo engrave mode works well; creates white marks |
| Glass (painted) | Engrave | 80% / 2000mm/min | 60% / 3500mm/min | 1 | Apply flat black paint first; laser fractures glass through paint |
Ortur lasers work with industry-standard G-code controllers. Choose the software that matches your experience level and operating system.
Windows only
Best for: First-time laser users who primarily engrave photos and simple text.
Windows / macOS / Linux
Best for: Serious hobbyists and small businesses who need production-ready workflow control.
RecommendedWindows / macOS / Linux
Best for: Designers who already use Inkscape and want to prepare files for laser cutting.
A diode laser is a Class 4 device. Following these guidelines is not optional — it is how you protect your eyes, your lungs, and your workspace.
Before contacting support, check these solutions for the issues we see most frequently.
Our support team is available Monday through Friday, and most questions get answered within 12 hours. You can also check the Ortur Blog for in-depth tutorials and project walkthroughs.